
Part 1: Getting the GSM working
One of the projects I’m undertaking is a remote GPS tracker for my vehicle.
True, you can purchase these in the 30 dollar range from Deal Extreme if you search vehicle trackers. However, I did see questions regarding temperature and stability. And one of the worries for me is the websites used for tracking are individually controlled by small companies in China (which could go out of business at any moment).
With that said, GPS and GSM combo units from popular sites such as SparkFun, AdaFruit or CanadianRobotics are likely to run in the 100$ area. An alternative, is to use a unit such as a SIM908 module at ElectroDragon for 42$, which is a little more affordable and matches my cheap “I’m just learning, I’m going to break it, I don’t want to spend a lot on it” period in my arduino timeline.
What you need:
- A sim card
- You will likely want a sim card size changer
- You will need an Arduino, I used a Uno for this
- The SIM908 module
The good news:
- Its cheap
- Its small
- Comes with everything you need (except for a GSM and GPS antenna)
- Has good English data instructions on the SIM908 website, albiet not natively arduino friendly
The bad news:
- Arduino wise, there is no documentation
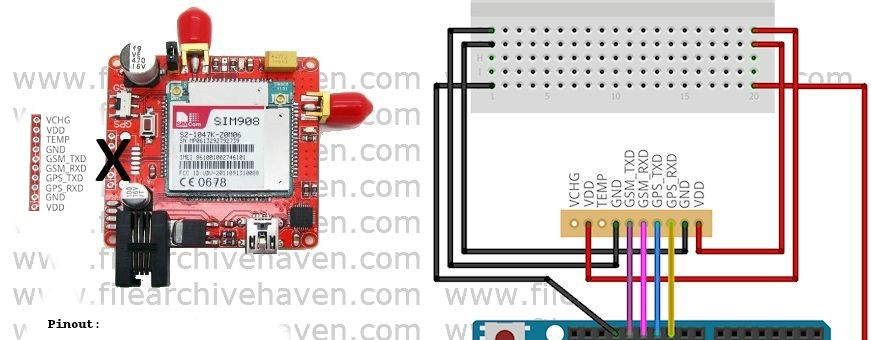
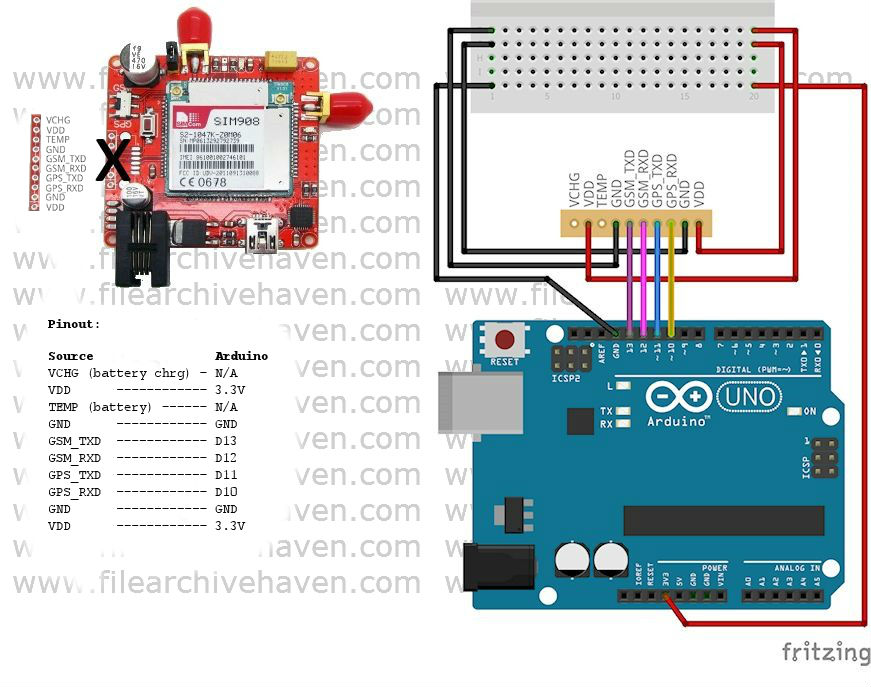
- The pinout provided on ElectroDragon is wrong (it shows a 6 pin SIM908 breakout, where they actually shipped a 10 pin SIM908 breakout)
Disclaimer:
So first, before reading any further, I have to caution. I’m not an electrical engineering type. And I don’t normally work with raw items very often. With that said, I’ve managed to get the SIM908 to work properly for me using the instructions below.
Restarting the SIM908
When you restart the unit or the Arduino, you may see the blinking red NET LED change to a solid red “I’m going to ignore you” LED. When this happens, hold the reset button on the SIM908, press and release the reset button on the Arduino, and then release the SIM908 reset button. This seems to move me to a blinking red NET light more often.
Pin-out Method:
Sample Code – Version 1.0 – GSM Only:
Unfortunately, when I purchased the unit, I missed that it came without antennas. This means I can’t confirm the AT commands and network connectivity until part 2. For this one, I will include code that will have you up and running from a GSM perspective, with this unit.
I found code written here, and reworked it to create a basic SIM908 GSM library. GPS is pretty much ready, but you will see it in part 2 (where we finalize the code, and finalize the design).
// Based on the 900 sim on cooking-hacks.com by Alejandro Gallego
// Reworked from from Serial to Software Serial and reformulated for GPS by Lloyd Summers
#include <SoftwareSerial.h>
int txPin = 11;
int rxPin = 10;
int modGSMPin = 8;
int modGPSPin = 7;
int pinDelay = 3000;
int8_t answer;
char aux_str[30];
char phone_number[] = "4036900707";
SoftwareSerial myGSM(rxPin, txPin);
void setup() {
// put your setup code here, to run once:
pinMode(txPin, OUTPUT);
pinMode(rxPin, INPUT); // used to turn on and off GSM
pinMode(modGSMPin, OUTPUT);
pinMode(modGPSPin, OUTPUT);
Serial.begin(115200);
Serial.println("Initializing...");
myGSM.begin(9600);
powerOnGSM();
Serial.println("Connecting..."); // checks for connection I believe
while ((sendATcommand("AT+CREG?", "+CREG: 0,1", 500) ||
sendATcommand("AT+CREG?", "+CREG: 0,5", 500)) == 0);
// 0 = not registered, not searching
// 1 = registered on home network
// 2 = not registered, but searching
// 3 = registration denied
// 4 = unknown (out of coverage?)
// 5 = roaming, registered
// 6 = SMS only, home network
// 7 = SMS only, roaming
// 8 = EMS
// 9 = CSFB not preferred, home network
// 10 = CSBFB not preferred, roaming
sendATcommand("AT+CREG=?", "OK",1000); // verifies network list
sendATcommand("AT+GSN","OK",5000); // IEMI
sendATcommand("ATX4","OK",5000); // Listen for dialtone + busy signal when dialing
delay(1000);
sendSMS("This is a test","4036900707"); // Test SMS
hangUp();
}
void loop() {
// put your main code here, to run repeatedly:
}
void hangUp() {
sendATcommand("ATH", "OK", 3000);
}
void sendSMS(char *message, char *number) {
Serial.println("Sending SMS...");
sendATcommand("AT+CMGF=1", "OK", 1000); // prep SMS mode
// sprintf(aux_str,"AT+CMGS=\"%S\"", number);
// answer = sendATcommand(aux_str,">", 2000);
answer = sendATcommand("AT+CMGS=\"4036900707\"","OK",1000);
if (answer == 1) {
// myGSM.println(message);
myGSM.println("Test message.");
myGSM.write(0x1A);
answer = sendATcommand("", "OK", 20000);
if (answer == 1) {
Serial.println("Sent.");
} else {
Serial.println("Error");
}
} else {
Serial.print("Error ");
Serial.println(answer, DEC);
}
}
void dial(char *number) {
Serial.println("Dialing phone number...");
sprintf(aux_str, "ATD%s;", number);
sendATcommand(aux_str, "OK", 10000); // dial
}
void powerOnGSM() {
uint8_t answer = 0;
// check if the module is started
answer = sendATcommand("AT", "OK", 5000);
if (answer == 0) {
// Send power on pulse
digitalWrite(modGPSPin, LOW);
digitalWrite(modGSMPin, HIGH);
delay(pinDelay);
//digitalWrite(modPin, LOW);
// wait for answer
while (answer == 0 ) {
answer = sendATcommand("AT", "OK", 2000);
}
}
}
int8_t sendATcommand(char* ATcommand, char* expected_answer, unsigned int timeout) {
uint8_t x = 0, answer = 0;
char response[100];
unsigned long previous;
memset(response, '\0', 100); // initalize string
delay(100);
while (myGSM.available() > 0) {
myGSM.read(); // clears the buffer
}
myGSM.println(ATcommand);
// Serial.println(ATcommand);
x = 0;
previous = millis();
do {
if (myGSM.available() != 0) {
response[x] = myGSM.read();
x++;
if (strstr(response, expected_answer) != NULL) {
answer = 1;
}
}
} while ((answer == 0) && ((millis() - previous) < timeout));
Serial.println(response);
return answer;
}
Now, when the code moves to part 2, we need to actually close the Software Serial connection to GSM in order to switch to GPS. The commands we will be using will be:
  seqSend("AT+CGPSPWR?");    // what power mode are you?
  seqSend("AT+CGPSPWR=1");   // power on
  seqSend("AT+CGPSTATUS=?");   // test command, what modes are supported
  seqSend("AT+CGPSSTATUS?"); // status, replies: Location Unknown, Location Not Fix, Location 2D Fix, Location 3D Fix
  seqSend("AT+CGPSINF=0");   // get location, Response:  mode,long,lat,alt,utc,ttff,num,speed,course
請問,可以分享您有有沒有用arduino做好gsm跟遠方手機連結
购买了从 http://www.electrodragon.com 模块
The SIM908 module has 2.8V pins at the data interface side. Connecting the SIM908’s inputs directly to Arduino’s 5V outputs will certainly lead to SIM908 pin damage sooner or later. It’s recommended to use level converters or at least voltage dividers with those pins. Also VDD must be connected to an external 5V and preferably 2A or more power supply. Connecting VDD to Arduino’s 3,3V makes no sense, even if it seems to work at first (MIC29302BU regulator will be working off specs). Connecting VDD to Arduino’s 5V may also work but will let SIM908 prone to random resets and malfunctioning. Remember Arduino’s 5V output can supply less than 1A and SIM908 alone has peaks as high as 2A during GSM/GPRS transmissions. A big electrolytic capacitor (1000 to 4700uF) installed across VDD/GND pins may minimize the problem. All that being said I advise not to follow the connection diagram on this page as it is presented.
FYI I’m not ignoring the comments you submitted. Just taking a bit to get to them. Some very good points and it could be my error for taking the pcb specs from the company in China (what they had at the time) without validating it further. I will review the below against the custom SIM908 pcb from ED. And validate the info before changing the article. I don’t want to recommend adding a capacitor if it’s either already on the board, not recommended by ED, and not validated to work properly by myself (its just a precaution – not that I don’t trust you). But if it makes good sense with their PCB as configured I’ll be happy to add it. Same with voltage changes provided I validate it. This is a *really* old article so it’ll be awhile before I get back to it :) With that said it’s been working without issue for 8+? months as configured in the article per ED’s specs – so I’m hesitant to change anything without looking closer. I’ve actually moved onto Navspark since for GPS tracking.
THIS COD WORK QUECTEL M80 GSM MODULE ?? .
I don’t have one to check 🙁 but the code may work. The pinout probably not.
Hi Lloyd. I have also been working on navspark-GL for GPS tracking. And was trying to connect GSM SIM 900 to it, but the code doesn’t upload and shows error- ‘The code can’t upload for Navspark-GL’ I’d really appreciate some help.
With that all said, if you have posted up an article somewhere with it validated as working, I’d love to link to it in this article for people.
Hi, when it will be posted the part 2 of this program. the one for the gps? how do i make it to pass the pin number from the sim card? thanks.
How to identify GSM TXD and RXD in Sim 908 module?
plwase I want the code with GPS to send the coordinate to GSM then to phone num
are u get code, pls sent me at mail: tvtudtvt@gmail.com. thanks
please I want the code with GPS to send the coordinate to GSM then to phone num
HELLO..sorry im new in arduino. can i know pin 8 and 7 that u declare connected to where in the sim908?
PIN 7 & 8 weren’t connected to anything on the Arduino side. On the GPS side it was 10 and 11. But I didn’t use the GPS much (I use navspark for most of my GPS needs). With that said, you might be able to get better information these days from http://www.gsmlib.org/
Has it work yet?