What if you were away from home for a few weeks and wanted to control your lights? Or you wanted to be able to remotely access a temperature sensor at home? There are a couple of ways to do this including Wi-Fi and GSM modules. Ethernet or Bluetooth shields, Or all in one units such as an Arduino Yun.
Where to Get One
There are a few places you can grab an Arduino Yun. But the parts for this particular build were purchased at the following links:
What Makes a Yun Unique
A Yun does several cool things. It can connect to a Wi-Fi network and run as a web server. It can host its own wireless network. It can do both at the same time. It can run and manage web sessions. It has both a Linux and ATMega backbone split. It works on Ethernet as well. It takes an SD card which can be used to store websites. And it can act as a USB controller, too cool.
Setting up a Yun
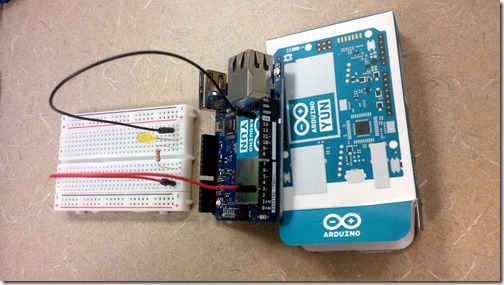
Once you have a Yun:

- Connect it to power
- Connect the long LED arm to a 330ohm resistor
- Connect resistor to pin ~3
- Connect second smaller LED to GND
- Note: You should see an ArduinYun{code} Wi-Fi zone
- Join the Wi-Fi zone and browse to 192.168.1.240.

- When prompted for credentials, use Arduino as the password.

- Press configure when prompted.

- For this build, I called it ‘Yun’

- I also disabled passwords for now.
Grab the Code from Github
Once you are ready, download the code from my Github and extract the zip to your Arduino sketches folder. Or copy/paste from below.
#include <Bridge.h>
#include <YunServer.h>
#include <YunClient.h>

int LEDPIN = 3; // your LED PIN
YunServer server;

void setup() {
  // Start our connection
  Serial.begin(9600);
  pinMode(LEDPIN,OUTPUT);
  digitalWrite(LEDPIN,HIGH); // turn on Led while connecting
  Bridge.begin();

  // Show a fancy flash pattern once connected
  digitalWrite(LEDPIN,LOW);
  delay(150);
  digitalWrite(LEDPIN,HIGH);
  delay(150);
  digitalWrite(LEDPIN,LOW);
  delay(150);
  digitalWrite(LEDPIN,HIGH);
  delay(150);
  digitalWrite(LEDPIN,LOW);
  delay(150);

  // Disable for some connections:
  // Start listening for connections

  // server.listenOnLocalhost();
  server.begin();

}

void loop() {
  // Listen for clients
  YunClient client = server.accept();
  // Client exists?
  if (client) {
    // Lets process the request!
    process(client);
    client.stop();
  }
  delay(50);
}

void process(YunClient client) {
  // Collect user commands
  String command = client.readStringUntil('\\'); // load whole string

  // Enable HTML
  client.println("Status: 200");
  client.println("Content-type: text/html");
  client.println();

  // Show UI
  client.println("<B><Center>");
  client.println("<a href='http://yun.local/arduino/on\\'>Turn ON LED</a><br>");
  client.println("<a href='http://yun.local/arduino/off\\'>Turn OFF LED</a><br>");
  client.print("Command: ");
  client.println(command);
  client.println("</B></Center>");

  // Check what the user entered ...

  // Turn on
  if (command == "on") {
    digitalWrite(3,HIGH);
  }

  // Turn off
  if (command == "off") {
    digitalWrite(3,LOW);
  }
}
On Windows, this is usually C:\users\%username%\documents\Arduino
Once it is downloaded; open the sketch.
Modify the Sketch
In the sketch, double check the PIN that you used. Ensure the ‘yun.local’ references are changed to ‘(name_of_yun).local’.
...
    int LEDPIN = 3; // your LED PIN
...
    client.println("<a href='http://yun.local/arduino/on\\'>Turn ON LED</a><br>");
    client.println("<a href='http://yun.local/arduino/off\\'>Turn OFF LED</a><br>");
 ...
    digitalWrite(3,HIGH);
 ...
    digitalWrite(3,LOW);
Once you’ve mastered the brief code, improve on it. Add both analog and digital.
Upload the Sketch

Once you have completed your configuration, go ahead and upload the sketch to your Yun! Join the same network. And then run ‘yun.local/arduino/test’.where yun.local needs the correct hostname if changed from the defaults.
Get it on Github
Related Articles:
where did u store plce the html code
Hello! There is no HTML in the tutorial 🙂 just an Arduino sketch. You need to upload it to the Arduino, and it will generate the HTML for you. It’s in the process() loop above.
Worked on it for hours without any luck…. I’m using Chrome then added command.trim(); before the if statements and presto!! Not sure why but .. hey it works now Thanks for posting
Nice!!: it’s been ages since I wrote this and I used Firefox at the time. Good command to share!
Pls am using seeeduino cloud instead of arduino yun, and I see server not found when I click any of the button on the browser
same instead of yun.local you replace it with the seeeduino ip address something like 10.2.0.XXX
nice
Hello Lloyd, The sketch would not work until I added the below line. My browser is Google Chrome. // Turn on command.trim(); // This line Added if (command == “on”) { digitalWrite(3,HIGH); } // Turn off command.trim(); // This line Added if (command == “off”) { digitalWrite(3,LOW);
Hey guys, when I uploaded the sketch and opened the yun.local/arduino/test it asked me to give a username and password, i tried the comination of my arduino’s name+ password that i used to configure the arduino, but that didn’t work. Now i’m locked out of the page. when i unpugged and replugged the battery it still refused to let me into the test page. help??
I found somewhere that you are supposed to write ‘root’ as username. Now the browser doesn’t tell me that i’m blocked, but the site itself only shows this line: Could not connect to YunServer 146 Connection refused, any idea what the issue could be?