
Are you trying to get BFB (Built for BlackBerry) designation for your Unity game on BlackBerry? Or just looking for the quickest way to setup the Moga gamepad? Arguably, the easiest way is to simply add gamepad support.
This post will show you step-by-step how to add the Moga game-pad to your Unity game without any additional plugins.

Configuration
Axis:
- joystick axis X = L Joy X
- joystick axis Y = L Joy Y
- joystick axis 4 = R Joy X
- joystick axis 5 = R Joy Y
- joystick axis 6 = DPAD X
- joystick axis 7 = DPAD Y
- joystick axis 9 = Shoot left, -1 to 0
- joystick axis 10 = Shoot right, 0 to 1
Buttons:
- joystick button 0 = A
- joystick button 1 = B
- joystick button 2 = X
- joystick button 3 = Y
- joystick button 4 = L bumper
- joystick button 5 = R bumper
- joystick button 6 = Select
- joystick button 7 = Start
- joystick button 8 = Joy Press L
- joystick button 9 = Joy Press R
Setting up Unity3D – Input Settings
The one challenge to mention is that the gamepad buttons are not the same platform to platform. The axis you specify when testing on a Windows machine using a Moga in HID, for example, will change when you move to mobile. For the duration of this article, I will just share the button combinations for BlackBerry 10. But I will include a package you can use on Android or BlackBerry to find the right buttons.
First, in Unity, you need to specify the Input options
Select Edit > Project Settings > Input
In here, specify the Axis for the Joysticks that you care about. Use the following as a template, but remember you will need to set up every axis you wish to use. Please note that the Gravity, Dead and Sensitivity are kind of important on setting up the axis. Not so much on the buttons.
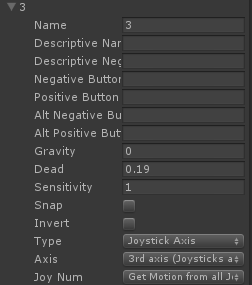
This would setup Axis 3 (which, ironically, doesn’t exist for Moga on BlackBerry). You also need to setup the buttons. You can also use the following as a template.
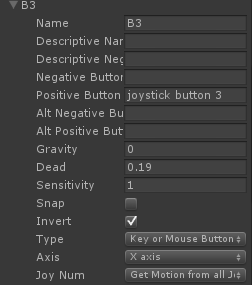
This would setup button Y.
Script Examples:
Checking of the B3 button we created above is down, is fairly straight forward:
if (Input.GetButtonDown("B3"))
{
Debug.Log("Joystick button 3 is down");
}
Checking on the axis is just as easy, but also yields a float value typically from -1 to +1:
if (Input.GetAxis("3")!= 0)
{
Debug.Log("Joystick axis 3 is " + Input.GetAxis("3").ToString());
}
That’s pretty much it. From there, its up to you on how you want to tie this stuff in. I also usually combine the Gamepad scripts with a nice asset called Control Freak for mobile touch integration (big thanks to Tom from AgeTDev for suggesting that script to me!).
Hope it helps!
Samples:
BAR file for testing on BlackBerry (also good for testing and configuring additional GamePad’s and Controllers)
ZIP file containing a simple project for testing