I want to take a minute to discuss something very important, Disaster Recovery and Backup Plans. Here is my current setup and hopefully inspires some others to create their own! This is just how I setup my own backups at home, and many people do it different ways.
For young (especially free opensource) developers, it can be very difficult to find backup solutions. As a developer, you are always responsible for your customers – which means being responsible for your code. Many times I have seen great projects die overnight because a PC’s harddrive failed, or a website backed up “blank” files, or the backups required configuration files that only existed on the (now dead) master.
Setting up a dedicated backup PC (optional)
This is optional. You can backup to a second PC in your household (This will give you a redundant backup solution). However in my case, I wanted a second layer of protection so that if my backups fail they can still be recovered.
To do this, I decided to build a media / file server that would hold both a RAID0 for media sharing, and a RAID5 for the backups. The RAID5 allows me to lose one drive in the cluster, and still not lose any data.
You can purchase a NAS for several thousand that will do this. But using NewEgg, I purchased 4x 2TB 7200 RPM drives and 1x 128GB SSD – with enough space to expand to 12 spinning disk drives. I also purchased two RAID controllers and everything else I needed for a basic storage backup system.
Drive Y (Share): 1x 2GB was setup for RAID0
Drive X (Backups): 3x 2GB was setup for RAID5 (which came out to about 4GB because of the redunancy)
I originally went with Windows Server 2012, but I had a hard time finding free software alternatives for anything and realized it was a bit too much for what I needed. Instead I moved it to Windos 8, enabled file sharing and enabled DLNA. I also installed PlayOn, TVersity, and ORB because I know that DLNA does not stream properly to Xbox 360.
Once I had all my shares setup, enabled permissions for my user accounts, it was time to begin backing up!
Installing Free Opensource Backup Software
Note: You can also create ISO images of your operating system for backup purposes! I chose not to, and only backup my data.
I tried a lot of different packages. But I opted for Areca because it was simple to use, allowed for incremental backups (so I could restore a file from its state one week ago, 4 weeks ago, or a year ago) and setup scheduling.
Step 1: Install Areca
Step 2: Create the following folders on your backup share:
Y:\Backups
Y:\Backups\PC_NAME-ArecaBackup
Y:\Backups\PC_NAME-ArecaBackup\Logs
Y:\Backups\PC_NAME-ArecaBackup\Batches
Y:\Backups\PC_NAME-ArecaBackup\Workspace
Y:\Backups\PC_NAME-ArecaBackup\Backup
Step 3: Run Areca, press Select, and specify the Workspace folder (above).
This is where the configuration files will be saved. You want these files on the fileshare to make sure you can access your configuration files in the event of a failure!
Step 4: Right click and select New Group, call it Backups
Step 5: Right click and select New Target, call it Backups (PC NAME)
Step 6: For Local Repository, specify the path above that says Backup
Step 7: Under Sources, select the folders you wish (usually your C:\Users\Your_Name, and any special local folders with development files)
Step 8: Compression, select Zip 64 and check Store each file seperately and check Add “.zip” extension
This way, you can manually rescue the files if you really need to via the output ZIP files.
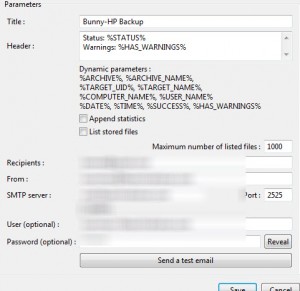
Step 9: Under post-processing, add two settings. Store the local report on disk, and specify the folder above entitled logs. Send the report by email, and you can email yourself when backups complete.
Your backups are now ready.
Creating a backup strategy (so you dont have to manually run it every day)

Step 1: Press Edit > Wizards > Generate Strategy
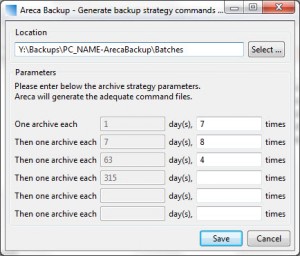
Step 2: Under Location use the folder above called Batches
Step 3: Use the settings below:
One archive each 1 day for 7 times (it means incremental backups every day for 1 week)
Then one archive each 7 days for 8 times (it means incremental backups for every week for 8 weeks)
Then one archive for each 63 days for 4 times (it means incremental backups for every two months or so)
Step 4: Launch Windows Task Schedular
Step 5: Create a daily, weekly and monthly task (that runs at different times)
Step 6: Tell it to use your current user (not the global user) and run the batch files you created. Specify the start folder as the batch folder above.
Step 7: Test one and make sure it works!
Hints: One thing to mention, I added a second layer of logging inside the actual BAT files. I have it create a log file called DailyRunning.log to store the date/time/status using >> for piping. At the end I rename DailyRunning.log to DailyDone.log – this way I can see via FTP at work if my backups completed or what the status is without requiring remote access.
Closing notes:
This isn’t quite true DR! For one, I only take manual images of my OS every so often as ISO’s.
Technically you should not keep your data backups in the same building as your actual PC (EMC requires 1,000 KM distance). But, I do have the added protection of all my systems submitting data to one central server for backups. And the backups are running on RAID5 so that I can lose a hard-drive without losing all my data. This means my data is double protected with the ability to revert to an earlier version of all files on my network at almost anytime.
I also have a cloud storage solution that I use for source code (private Github) but you could use a DropBox account the same way! Hope this helps someone with setting up their backups as this is the system I found that works best for me today.
If you have read this far, you are a brave person (it was a lot of writing!).
Ed.


One thought on “Backing Up Your Work”