Hi everyone,
Welcome to part two of the Ghost Box Build! in this article, we will cover most of the Raspberry Pi customizations. We will setup the display, setup wifi and setup the camera.
Parts List
- Raspberry Pi
- Raspberry Pi – No IR Camera
- Raspberry Pi – Touch LCD
- Raspberry Pi – Plastic Case
- Raspberry Pi – 8GB SD & NOOBs
- Any 5v USB Rechargeable Battery
- 22 AWG Wire
- Heat shrink tubing
- 1x Mini-stereo connector
- Mini Speaker
- Any USB Wifi Dongle (with Linux drivers)
- Any USB Microphone (with Linux drivers)
- 5x Red LED’s
- 5x Green LED’s
- 10x 330ohm Resistors
- 1x Toggle Switch
- Light Sensor
Using Composite Continued
Earlier, I encountered issues connecting via Composite. Closer inspection has revealed interesting information. If you have not yet finished installing NOOBS, when you boot your Raspberry Pi and see a blackscreen, press 3 or 4 to enable Composite. This should allow you to finish NOOBS.
You will be prompted if you wish to set Composite as default, regardless of what you select, I find this option does not work.
Your Raspbery Pi will reboot and bring you to a black screen. This is because the cnofiguration page is somehow stuck on HDMI. Use HDMI temporarily to finish enough of your installation to have the OS ready.
Log into the OS via HDMI and launch Terminal.
# cd/
$ cd /boot
$ sudo Leafpad config.txt
This will open the config. Scroll to the bottom, you need to comment out the following 6 lines:
# hdmi_force_hotplug=1
# config_hdmi_boost=4
# overscan_left=24
# overscan_right=24
# overscan_top=16
# overscan_buttom=16

Setting up Wifi
Setting up Wifi was extremely simple, the drivers were built right into the operating system. I just installed the USB dongle, configured my network settings using the Wifi Config button.

As soon as you press Wifi Config, it will bring you to the customization screen.

If the top option box is empty with no selection, it means your Wifi dongle is not recognized. And you may need to install drivers.
The Network box will always be empty on launch, press Scan to find and configure your network.
Setting up VNC
VNC will let you remotely access your Pi from just about anywhere. You can specify custom ports and add port forwarding in your home router with a dynamic DNS to access your Pi from anywhere! To do this you will need to install a VNC viewer on your computer (I recommend TightVNC). And you can access your Raspberry Pi by IP:Port.
Installing TightVNC was extremely easy, except for one major issue. Be cautious during installation! You may accidentally lock yourself out and need to make some changes.
Installing VNC Server
On your Raspberry Pi, launch Terminal. Use the following command to install tightvncserver.
$ sudo apt-get install tightvncserver
Do your first launch setup:
$ tightvncserver
Now that it is installed, its time to setup your first connection.
$ vncserver :1 -geometry 1024x768 -depth 24 -rfbport 9010
Adjust the above as necessary.
More information on setting it up is available here for creating an autorun on launch. However, be cautious of two very important things:
The instructions for making it run at boot have bad commands for LINUX. You need to retype all blank spaces for it to process properly. You can also now use “/etc/init.d/vncboot start” and “/etc/init.d/vncboot stop” to handle your VNC server going forward.
Also be very cautious – if after you finish your install you see an error where it keeps asking you to login to start your Raspberry Pi, this is because ownership of a critical file is now being assigned to root. To resolve this issue:
chown pi /home/pi/.Xauthority
Do a reboot test to make sure that the script is executing properly. Also note, that high resolutions are very difficult over Wifi.
Setting Up SSH
Now that we have VNC, you will also probably want intermittent console / terminal access. This is essentially what we will do with SSH. You will need an SSH client on your PC such as Putty. We will be using an SSH connection to configure the TFT screen.
Install SSH using APT Get:
sudo apt-get install ssh
Start up SSH using the following:
sudo /etc/init.d/ssh start
Set it to run on startup:
sudo update-rc.d ssh defaults
Voila! SSH access.
Setting up the TouchScreen
Please note: The touch screen requires Raspbian. It requires internet access. And it requires patching of the system.
Above is a video showing you how to solder the connector for the LCD. This is fairly straight forward.

Once you have finished assembly, have internet access, are logged in and ready to go. It is time to update the software.
Updating Software
In typical Adafruit fashion, the update steps and information does not work as expected when relating to software (hardware is really their strong point). And forum posts for people seeking help went ignored by the owners. To date, I’ve never had anything somewhat complex made by Adafruit work the way it was intended, and I’ve never had actual help from their support team. In fact some things like their AVR was too messed up to even be resolvable.
Alas, I digress. Follow the steps here to update the software with several important mentions:
- Follow the instructions carefully.
- Try to run it over SSH (putty) instead of in a GUI, it didn’t work for me until I did that.
- If the touch doesnt work or issues cant be resolved, loosen the two black connectors on the back of the TFT unit. Disengage the LCD and reconnect. My connectors looked right but that fixed my touch issues.
- When the Adafruit boot instructions don’t work, and you receive error:
[   14.790855] stmpe-spi spi0.1: unknown chip id: 0x0
[   14.806136] stmpe-spi: probe of spi0.1 failed with error -22
Open LXterminal:
sudo nano /etc/rc.local
And add this to your startup profile just below exit: 0, thanks ordenrahl!
sudo modprobe spi-bcm2708
sudo modprobe fbtft_device name=adafruitts rotate=90
export FRAMEBUFFER=/dev/fb1
startx
What this does, is access the driver. Configure the driver. Tell the OS what screen to use. And then launch the GUI.
You may need to disable this to use composite or HDMI later. Although there are FRAMEBUFFER commands to change that on the fly. However I suspect this patch is the reason calibration never worked for me.
Update: After reimaging my SD card and working through these steps, I found that this did not work. The quick fix for me was to allow the Pi to handle GUI by:
sudo nano /usr/share/X11/xorg.conf.d/99-fbdev.conf
And adding the following text:
Section "Device"

Identifier "myfb"

Driver "fbdev"

Option "fbdev" "/dev/fb1"

EndSection
Time to Calibrate

Follow the instructions here to calibrate your screen.
I have to add, the calibration tools never worked for me. At the start of their instructions they configure a device and a symlink. That symlink never starts working. But if you read the software update instructions, you can see how the calibration was specified. In my case, I just manually entered my calibration figures.
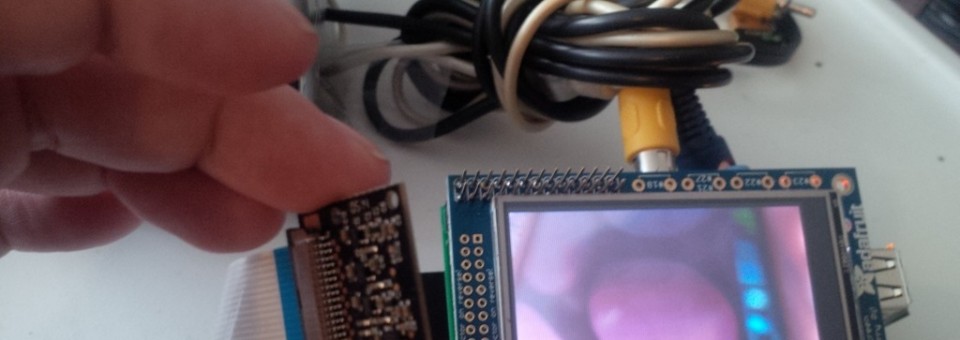
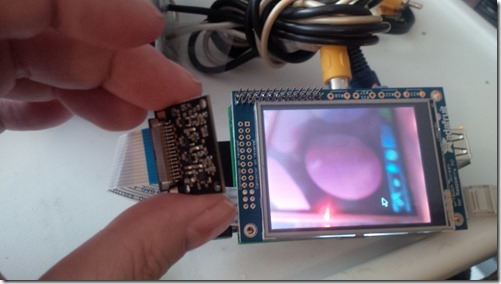
Testing the No-IR Camera

Download Pi Vision from your Raspberry Pi. Please note this will only work on the LCD not visible over TightVNC. This is not a normal apt install, we will install this by hand.
Click on Accessories > File Explorer. Browse to ~ (should take you to root).
Double click on the package. Extract the file.

Right click on the file inside the folder, select Properties and Permissions. Make the file an executable and OK (shown above).
Now you can launch the file to control the camera! I found using the camera over VNC disconnected me and saved a JPG on device in the same folder as the app. At the same time the camera view would appear temporarily over composite but not TFT. This is OK. We will be more concerned about this in the software design level.

Success!
Stay tuned for parts 3 + 4.
RPI has changed a lot since this build. Can you remake it using the RPI 3B+? Add the SHT31 D sensor too.
Will definitely keep it in mind! I really want to reboot these articles.
Hi, when will we get part 3 and 4 please?